Pocket doorways are convenient, manage you more area in a room, and they look stylish. Nonetheless, if installed incorrectly or you use inappropriate or minimal-top quality components, they can scrape, capture, and be very difficult to appropriately open and near. As these kinds of, even though putting in a pocket doorway by yourself is achievable, you do need to have to stick to the appropriate actions to make sur you get it just right.
Beneath, we have outlined the method required to install a pocket door, in 10 steps, but if you are not sure of any of the levels or anxious about obtaining it mistaken, it could be value receiving a carpenter or handyman in to do the work for you.
Materials
Putting in a pocket doorway does mean that you need to get down drywall, as effectively as get rid of any present doorway. This indicates that it is a bigger occupation than simple changing an current doorway with a new a single. Nevertheless, if you get issues slowly and gradually, get a decent pocket door kit, and use the right equipment and gear, you can get the work completed your self for a few of hundred bucks, fairly than paying a expert to do it for you. Right here are the resources and resources that you will demand.
How To Install A Pocket Door (10 Steps)
1. Remove the Existing Door
Just take the existing door off its hinges and then eliminate the molding. Use a reciprocating observed and cut the shims. When the nails are out, you can get off the total doorway body.
2. Remove the Drywall
The pocket of the pocket doorway sits inside of the wall, which means that, at this stage, you require to take away the drywall from one facet. Use a utility knife to minimize through the wall and carefully get rid of the drywall up to a handful of inches over the peak of the header. There’s no need to have to go all the way to the ceiling, as this will make it far more tough when it will come time to put new drywall in later on.
3. Cut the Studs
When the drywall is down, it will leave the studs uncovered. You can use a tiny hand noticed, but a circular noticed will make the job simpler. Whichever you use, guarantee that you really do not damage the aspect of drywall that you remaining in place, or you will find by yourself possessing to fix this as effectively. You need to leave adequate room in the studs so that the pocket door can pass totally through.
4. Install the Slider Track
Install the slider monitor on the wall half of the pocket door. Assuming you acquired a pocket doorway kit, the track will have been incorporated. Screw the brackets into the studs for security and security and make certain that the observe is level by employing a degree. In some instances, it could be needed to lower the monitor down to the appropriate dimension. Some kits have markings for different sized doorways, but not all do.
5. Insert the Door Into the Slider Track
When half of the slider keep track of is up, mount the wheels on top of the doorway. These will sit inside of the track and allow you to slide the doorway from a single conclude of the observe to the other. After the wheels are equipped, slide the carriages into the track at the open up stop. Modify it until finally the door is amount and it slides smoothly back again and forth and then fix the remaining 50 % of the keep track of.
6. Replace the Drywall
Use adhesive and screws to resolve new drywall of the same size as you taken off before. Use new drywall and have the merchant reduce it to dimension for you, using your outdated piece as a information. Really do not tape and mud the drywall but, though.
7. Install the Latch
The door kit will have incorporated a latch that goes in the door and a section to attach to the wall. This keeps the door closed. Match the latch in the doorway and the wall, ensuring that the two line up and following the guidelines that arrived with your doorway package.
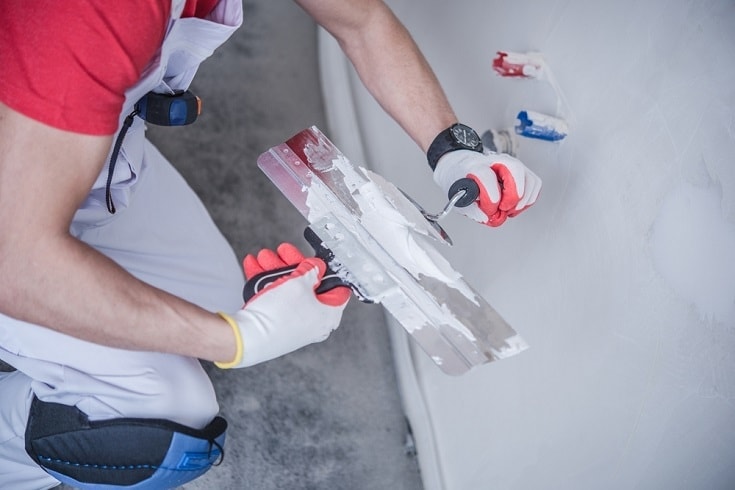
8. Finish the Drywall
Now you can complete changing the drywall by implementing tape and mud. Be generous with compound, making certain that you go over all the seals with multiple coats and tape. Permit the mud to dry and then sand it down. Utilize a lot more layers of compound adhering to the same actions and, when finished, give it a closing sanding to ensure that it is totally clean.
9. Paint and Finish
Now you can paint and finish the wall, preferably to match present wall décor. By portray the wall, now just before you insert the door trim, it implies that you do not have to tape the trim or try and ensure straight traces simply because the trim will cover up any mess you make.

10. Install the Trim
Last but not least, incorporate the trim, screwing or nailing it to the jamb and door studs. As soon as this phase is comprehensive, you have concluded installing your pocket door.
Conclusion
Pocket doors seem great and, though you can not incorporate wall stores on the wall exactly where the pocket resides, you can hang shelves or spot cabinets and get benefit of the added area that a pocket door creates in this way. The approach does demand pulling down drywall, and it can get dusty when you’re sanding it down, but regardless of this, it is a relatively simple Diy activity that most individuals can achieve.
Showcased Graphic Credit: Kawin Ounprasertsuk, Shutterstock
Contents